Wondering How to Get Sharper Images?
Photography in today’s age is all about capturing moments and telling a visual story in a creative way. Many aspiring photographers take master classes just to learn basic to intermediate photography skills, and one of the many skills they need to acquire is how to get sharper images.
Image sharpness is elemental in photography. One of the many frustrations among DSLR users is coming back to their computer to edit their photos, and finding that their images are not quite sharp, or even out of focus.
Here are a few ways of getting sharper images that you can try and test out the next time you have your camera out.

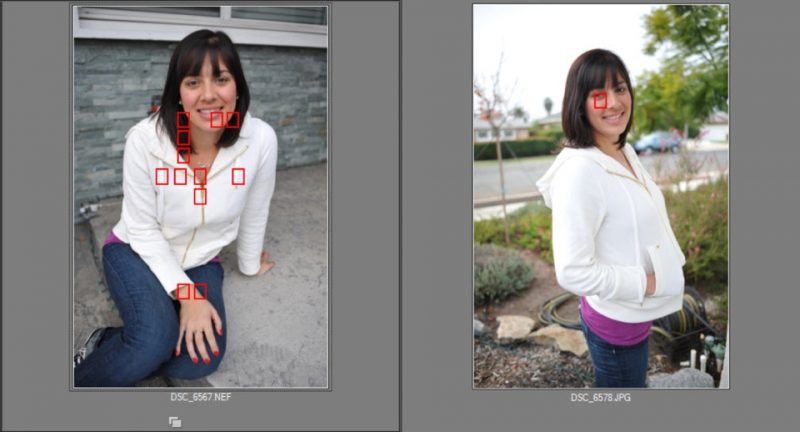
Focus on the Right Place. As you may already know, the first thing that we look at in a picture is the eye. Make sure that you focus your photo on they eye of your subject, or your photo won’t be as appealing as you would hope. When photographing a person, the focus should be on the eye closest to the camera.
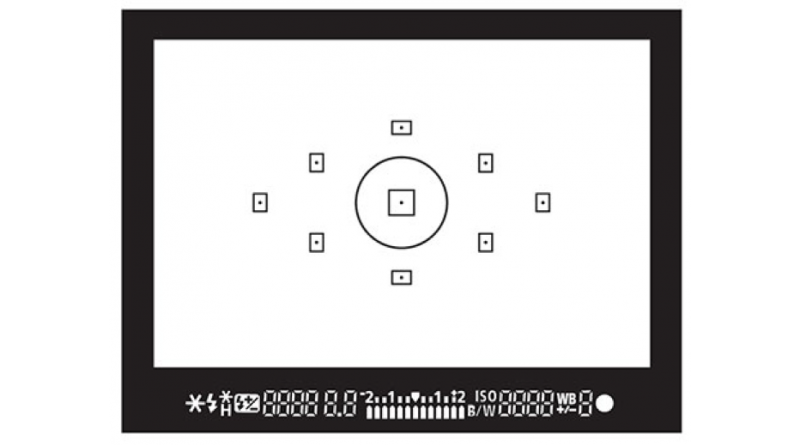
Choosing Your Focus Point. Most of the DSLR’s in the market today come pre-equipped with special settings that make it easy for new photographers to take full control of their camera. However, many photographers allow the camera to control where the focus point of an image is placed, instead of choosing the focus point themselves. It is important to never trust the automatic focus setting when wanting to take better, crisp and sharp images.
Cameras are devices that are excellent at many things. Over the past decades, their capabilities have been continuously improved by experts in the industry. However, one thing a camera cannot do is to read your mind! The closest thing a camera can do is to try to guess what you want to focus on, but that’s it. Sometimes, your camera can get it right, but often it doesn’t.
This is why we recommend that you manually select (or toggle) your focus point to the area of the frame you want to focus on. Remember: you can’t fix the focus of an image in an editing software, even in Lightroom or Photoshop. You have to get the focus right from your camera.

Also keep in mind that this is different than setting your camera lens on autofocus vs. manual focus. On a lens, manual focus means that you are opting to turn the focus rings yourself until focus is achieved, whereas autofocus on the lens means that you want the lens to achieve focus automatically, without you having to turn the focus rings. We discuss this more below.
Focus Modes. To get sharper photos, it will be important to know which focus mode to use, based on your subject and shooting conditions. For moving subjects, you will want to change it to a continuous focus mode, where for stationary subjects, a single shot focus mode will be adequate. You can read more about understanding which focus mode to use here.
If you are still unsure of how to set these modes on your camera, read through the manual. It contains instructions on how you can change these settings. There may be different names for such features as they differ from one manufacturer to another.
Auto-Focus Instead of Manual Focus. A lot of people get lost every single time photographers start preaching about the wonders of manual mode shooting. Professional photographers love manual mode. However, shooting in manual doesn’t mean you are manually focusing on each shot. What manual mode means is that you are given the freedom to choose your ISO, shutter speed, and aperture. What it does NOT mean is that you are using manual focus.
Most photographers that we know use auto-focus for almost all of their captures. If they change to manual, it’s because the lighting conditions (extreme backlight situations or low light situations) don’t allow the camera to focus successfully on the subject. Macro shots also call for manual focus.
[ad id=’4′]
More Tips to Achieve Maximum Sharpness
The tips below will make a huge difference to your photograph’s sharpness. Let’s get to the specifics.
The Sharpest Aperture. The lenses of a camera can achieve the sharpest photo at a particular aperture. It’s usually two to three stops down from your camera’s widest aperture.
The aperture that you choose is highly dependent on other considerations such as the depth of field needed and the acceptable shutter speed. However, try to stay near the optimum aperture if possible.
Single Point Autofocus. As mentioned above, a camera’s single point focus setting is telling your camera to focus on a single point. This will help you get precise and accurate focus to your images.
Lower Your ISO. A higher ISO most often means more “digital noise.” What happens is that sharp details in your photograph will now appear fuzzy. In turn, your image’s overall sharpness is affected.
Aim to set your camera to the lowest ISO setting you can. Of course, you have to remember that you need it high enough to keep the shutter speed where you need it as well. And always keep in mind: a little grain and an in-focus photo is definitely better than a photo with no grain that is out of focus!
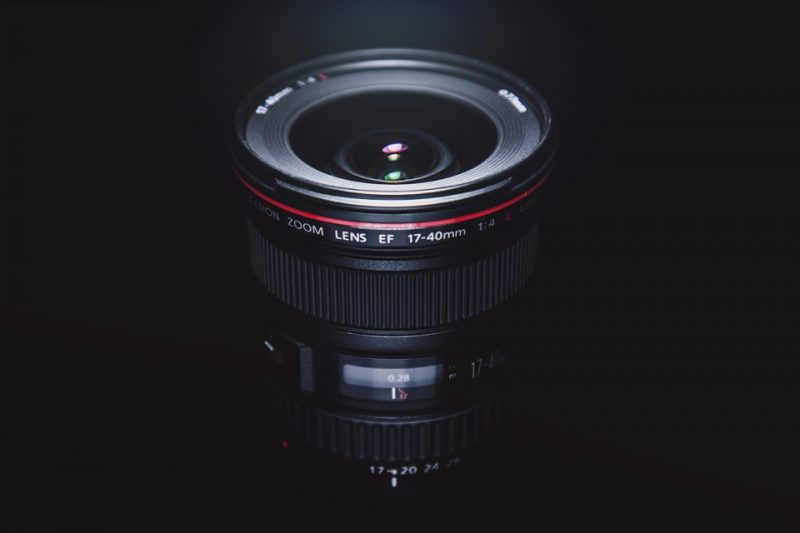
Use Better Lenses. The lens of a camera can make or break the final photo. Good quality lenses can help you achieve the sharpness that you want for your photos. More expensive camera lenses are usually sharper in comparison to the cheaper versions simply because they are more well made. Upgrading your camera’s lenses can be costly, however, buying better lenses is a wise investment at the right time, because it will take you steps closer to producing better photos. You can read more here about upgrading your kit lens!
Remove Lens Filters. Filters may reduce your lens’s sharpness, and you don’t want this as it will affect your final image’s quality. If filters are not needed, and you want to improve the clarity of your photographs, take them off.
Check the Sharpness on the LCD Screen. Since we have moved on from film to digital photography, your captures can be seen immediately. To check a photo’s sharpness, taking a test shot is advised. Use the playback feature of your camera and try to zoom into your focus point. If you see blurring, re-shoot it until you are satisfied.
Sturdy Tripod. The use of camera support has become quite a demand for active and explorative photographers, simply because it can help eliminate camera shake and keep vibration or sensitivity to a minimum.
When you get a tripod, you are using it to ensure that your camera is still. This means you need that you need a sturdy tripod. Make sure you don’t overextend the legs and the center columns of your tripod if not necessary. If your tripod wobbles, you will have a hard time to get sharp images.
There are tripods that come with hooks underneath. Check if there’s a hook with yours and hang something heavy off it. This will give you extra stability. Most professionals carry empty “rock bags” that they will just fill with stones to give weight and hold their tripods. Bring a rock bag with you if you think you will go to locations with strong winds.
Remote Cable Release. Pressing your camera’s shutter button down will cause a bit of shaking. Amateur photographers think that the minor shaking can’t make a difference to their compositions. The professionals know that even the slightest shake can reflect in the final photos. A remote control or cable release is your best bet at avoiding this problem. Good news: it’s inexpensive!
Alternatively, you can use the self-timer feature of your camera. 2 seconds will give you time for any vibration to stop after the shutter is pressed.
Increase the Shutter Speed. The shutter speed is important to capturing motion. A fast shutter is used to freeze movement, a perfect example to use this is taking jump shot photos, dancing or running subjects, or any other fast moving subject.

The slow shutter, on the other hand, is used to slow down or capture the movement in the image. A slower shutter may also work on non-moving or less active subjects. However, a slow shutter speed is more susceptible to showing motion blur. Therefore, increase yours as much as possible. A rule of thumb: use “1/focal length” as your shutter speed.
Image Stabilization. You already know that a system designed to reduce vibrations in your camera can cause an issue when the device is on a tripod. This means that when you hand-hold your camera, you can make use of this feature! In optimal conditions, this system can give you exposure of at least 3 extra stops. This can define a photo that’s blurry from one that’s tack sharp.
Steady Yourself. When you hold your camera, your body is the source of movement and vibration. Therefore, you should try to be as still as possible. To do so, tuck your arms in your sides. You can also lean against a tree or wall for extra support.
Also, it’s crucial for you to even your breathing when shooting as it will cause minute movements to your camera. Practice breathing slowly while holding a camera. When you need to press the camera’s shutter button, do it in between breaths as that is when you become relatively still.
Squeeze Your Shutter Button. As you press your shutter button, make sure that you do so gently. Begin by touching the button or making sure that it’s in contact with your finger before pressing it. Then, gradually squeeze down instead of pushing it quickly. As soon as you push the button, don’t lift your finger immediately. Wait until your shot is taken.
Conclusion
Every photographer understands the importance of capturing and storing sharp and crisp images. Variables affecting how to improve on getting sharper images depend on the quality of the camera, confidence of the photographer, accessories used to eliminate disruptions but most important is skill level of the one taking the photos. Photography is a honed skill – if you love it enough to improve, then 5-10 minutes of your time reviewing and testing the tips above can make all the difference in your next photo shoot.