Adobe Photoshop Lightroom is the go-to photo editing software for photographers because it has everything you need to edit your images professionally and quickly. It comes loaded with useful presets and can accommodate extra presets that can be purchased and downloaded for your specific needs.
Although it can seem a little overwhelming at first, Lightroom is actually easy to use. Many Photoshop Lightroom presets are simple one-click edits that apply a series of adjustments to your photos instantly.
What’s Adobe Photoshop Lightroom?
Adobe Photoshop Lightroom is an excellent photo editing and file management software. With the click of a button, people can work on hundreds of images. Photoshop Lightroom guarantees non-destructive editing, which keeps original files from your camera intact while letting you make adjustments at any time.
Looking to improve your photography? Just enter any questions you have about improving your photography below and hit send and get answers & feedback instantly - for FREE! Submit QuestionsUsing Lightroom to Edit Photos: The Basics
- Who Should Use Lightroom?
- Importing Photos
- Organizing and Managing Photos
- How to Use Presets in Lightroom
- Basic Panel
- Adjusting Tone Curves
- Resizing an Image
- Crop and Straighten Photos
- Sharpen Blurry Pictures
- Blurring Image Backgrounds
- How to Use Spot Removal
- Lens Correction
- Color Correction
- How to Correct Exposure
- Saving Images
- Export and Backup
- Saving Images
- Lightroom vs Photoshop
- Practice Makes Perfect
With a few basic tips, you can get started with Photoshop Lightroom and begin editing your photos like a pro. If you have used Adobe Photoshop in the past, then Lightroom will be a breeze because you already have the Adobe Photoshop user interface knowledge and probably some basic photo editing skills as well.
Without the need of tutorials, you can create a Lightroom catalog of all your original photographs. You make adjustments to your images within Lightroom, then export them in your desired format, but the original remains untouched.
Don’t worry if you have never used Adobe software before. You will have a small learning curve to climb, probably a couple of tutorials and then learning the basics of Lightroom will come easy.
Who Should Use Lightroom?
Do you want professional-looking photos that people will admire and make you feel proud? You need professional tools, and Photoshop Lightroom is the photo editor you’ll want in order to achieve that level.

Anyone who has a digital camera and who wants to make adjustments to their final images can use Photoshop Lightroom. Professional photographers and amateurs alike go to Photoshop Lightroom to correct and tweak certain aspects of their work.
Photoshop Lightroom let people make big and small adjustments like changing photos to black and white, correcting white balance, adjusting curves and exposure, fixing lens distortion, adding effects, plus so much more.
If you shoot in RAW files, Photoshop Lightroom will enable you to edit your images while keeping the original shots intact, and then give you the choice to export them in a variety of formats and sizes.
Importing Photos
Upon your first use of Photoshop Lightroom, you will be prompted to create a Lightroom catalog. Choose a location on your computer and not an external hard drive.
When you insert your SD card, a grid will appear with all the photos that are on the card for you to choose. At the top of the screen, you will notice import photos choices. Choose “copy” and then give your photos a destination folder within the options that are on the right side of the screen.
[ad id=’3′]
It will also give you the option to rename your photos at this point, and apply presets and keywords while importing. This is a great time-saving tool, and it’s important to become accustomed to it.
Useful hints:
If you shot a wedding, add the keyword wedding to your photos so that they may be easily found in the future. You will simply do a search in your computer to find the word “wedding” and all photos with the keyword will show.
Applying your watermark and running actions like lens correction while importing are also great time-saving ideas!
Organizing and Managing Photos
Lightroom is an excellent tool for digital photography management. You can create collections and add keywords so that photos are easily found later. Create a filing system that works for you so you stay organized and never lose track of your photos.
It’s very similar to creating music playlists on Spotify or iTunes. Choose to collect them by mood, by genre, by color, or however you wish. Organize your photos as you see fit.
It may not seem as important when you are a budding photographer, but years from now you will be thankful you created a filing system for managing thousands of photos.
Lightroom Workflow
The most recent versions of Photoshop Lightroom have seven different modules in Lightroom Workflow:
- Library: Lets you organize and sort images, as well as add keywords and metadata. It also allows users to create collections, add presets, and share files.
- Develop: Where you can perform most of your post-processing with two viewing modes.
- Map: If your photos already have GPS information, the images will add themselves to the applicable areas on the map.
- Book: Enables you to design and create a book layout.
- Slideshow: Use images to make presentations.
- Print: Offers presets and layouts for convenient printing.
- Web: Work on images, presets, and templates exclusively for the web.
Batch Editing
Lightroom allows users to batch process photos. If you want to save time in editing, use this function to work on different pictures at the same time.
Start by highlighting the image you’ve finished editing. With multiple pictures selected, choose Settings > Sync Settings from your menus. You can also click the Sync button to ensure all your edits are synced.
How to Use Presets
First, let’s review how to install and save a preset in Photoshop Lightroom:
- First, click on Edit and Preferences.
- A new screen will pop out with several tabs, including Presets.
- Click on Show Lightroom Develop Presets.
- Paste the folder from your download that holds the files into this folder.
Lightroom comes packed with a variety of presets that will let you make easy tweaks and fixes to your photos in a few simple clicks.
As you get more comfortable with Photoshop Lightroom, you may start importing presets that you can download and purchase from other photographers online (we suggest you start with some of the Lightroom presets available in the Cole’s Classroom shop), and you can even start to create your own.
You will often repeat the same adjustments to your photos, which make presets so convenient. Becoming familiarized with presets will not only save you time but also minimize editing errors.
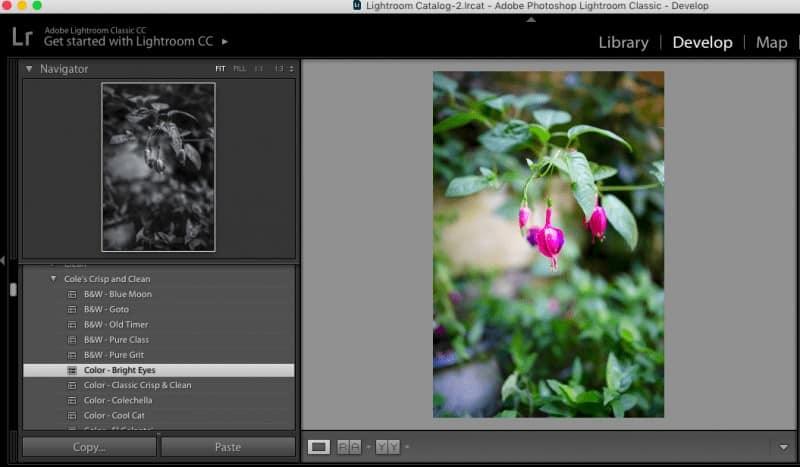
On the left-hand side of the screen in the module, you will have access to the basic presets that come with Photoshop Lightroom, such as black and white filters, tone options, some color tones, effects, and a few other categories.
Play around within the categories and notice what the presets do to your images. You will soon build a collection of your favorite presets that are the most helpful and convenient.
Once you become familiar with presets, you may want to experiment more by downloading some specific sets of presets available online.
Installing and implementing them is quite easy, and you will love how these presets cut down your editing time. For example, some of the available presets adjust softness and create romantic moods–perfect for wedding photography.
You can even create your own presets by clicking the “+” sign at the top right-hand corner and instructing it to apply whatever adjustments you want. Save your presets and name them so that you can remember exactly what they do.

Basic Panel
Presets are quite handy, but sometimes you will need to adjust photos manually. Learning to use some of the more basic elements of photo editing is essential if you want total control of your final images.
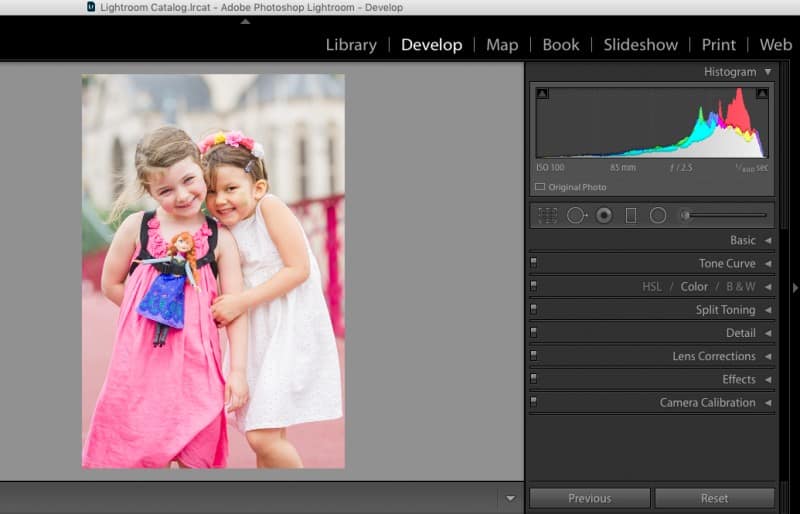
In the basic panel on the right-hand side in the develop module, you will see tools for modifying the white balance of your photos, adjusting the exposure, and a few other simple changes.
Adjusting the white balance is a very important skill to learn when photo editing. Nobody enjoys looking at those extremely yellow or excessively blue photos. Play around with the drop-down menu and the eyedropper to get the perfect white balance.
Adjusting Tone Curves
This is another great skill to learn when enhancing your photo editing knowledge. Learning to precisely adjust the tones in your photos will give you more power over the final images.

In the develop module, on the right-hand side right under the basic panel, you will find the tone curve option. You can add points on the curve line to increase highlights, darks, and mid-tones.
You can begin experimenting and finding your own style. This is a great way to punch up your photos, but be sure to use some restraint. Your photos can start to look unreal if you go overboard with highlights or create too many contrasts. Take it slow at first, and you’ll get the hang of it.
Resize an Image
Because camera sensors capture a large number of megapixels, you’ll probably shoot in the highest resolution possible.
Large megapixel sizes mean a huge amount of memory, and subsequently, size files that are too large for social media sharing. Lightroom, you can resize pictures in either centimeters, inches, or pixels.
Crop and Straighten Photos
Cropping pictures helps you cut out distracting areas. If you want to emphasize an element or focus on a subject, cropping also makes the illusion as if you’re zooming in on a picture.
To straighten a picture, select the photo in the Develop module. Choose the Crop Overlay tool to show the tool drawer. Drag the Angle slider to rotate a picture up to 45 degrees. You can also select the Straighten tool to apply image straightening.
Sharpen Blurry Pictures
After selecting a photo to edit, open the Detail panel to see settings for sharpening and clarifying image details. Then, select the Sharpening tool to see seven different ways to modify blurry pictures.
Adjust the Amount slider to help you specify the amount of definition in your photo. The slider gives the image a new, crisp look.
Noise Reduction
Notice that when you take photos with a high ISO setting, there’s a higher chance that the images will end up with noise. The problem is that any process to remove noise may affect the quality of a photo. Unfortunately, you can’t mask eliminating noise or only apply to certain parts.
If the noise seems distracting, Photoshop Lightroom helps you improve the overall look of a photo. To start, open the Detail Panel in the Develop module to show the noise reduction sliders. There you will see sliders for Luminance noise and Color noise. Adjust the slider until you get the result you want.
Blur Image Backgrounds
One of the best things about Photoshop Lightroom is that you can blur parts of a photo even if you weren’t able to capture a blurry background using a camera.
You must create a mask so that the blur will only affect a photo’s background. This is possible by painting over the background or parts of the background you want to blur. Using the brush tool, you can either create a custom effect or pick a preset brush effect to produce your desired blur.
Since you can change the size of the brush, the tool can help you pick the parts that you want to blur, while keeping other elements sharp. There’s also an option to use the erase brush to remove sections of a photo from the mask that you don’t want to blur.
After choosing the background you want to blur, you can modify the blur effect’s impact by editing the Clarity and Sharpness settings. Set the values for both at -100 to generate a full blur for a photo’s background.
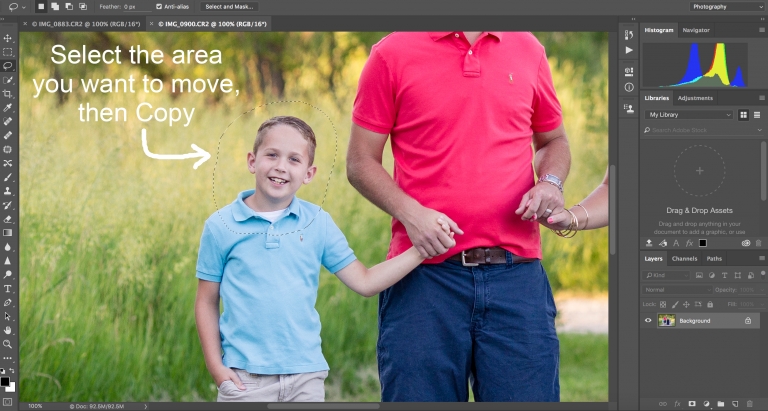
How to Use Spot Removal
Lightroom comes equipped with an easy and simple-to-use spot removal tool. You may have a perfect shot that has a small object that you wish was not there. With the click of a button, you can make it disappear!
Right below the histogram on the right-hand side in the develop module, you will find the spot removal tool along with the crop, mask, and red-eye removal tools.
You can either clone a part of the photo onto the spot you want to remove, or you can choose to heal it. The slider will let you adjust the size of the brush and the opacity.
Remove Red Eyes
Red eyes come from the direct flash reflecting the blood vessels in your subject’s eyes. With the red-eye correction tool, you can drag over the eye, make a bit of tweaking, and remove red eyes.
Lens Correction
Lightroom gives you the option to correct the lens distortion that may be present with certain lenses. On the right-hand side in the develop module you will find the lens correction panel where you will be able to correct the lens and also remove chromatic aberration.
Chromatic aberration is present when you see red or green outlines around objects in photographs. This is especially a concern when the photograph is for print.
Color Correction
The colors in your photos sometimes can be a little off, they might have several intensities or some objects might look unrealistic. Having the wrong colors in your photos will impact the mood and overall quality of it.
Luckily, Lightroom can help us correct these issues.
Before you can adjust the color in your photos, it’s crucial you have the RAW files of your images instead of the JPEG. The JPEG won’t take color adjustments as well as the RAW files and this will compromise the end product.
Working with Color Using HSL Sliders
One of the best ways to color correct your photos is Lightroom’s HSL Panel. In here, you can correct colors independently, without impacting the rest of the image.
HSL (Hue, Saturation, and Luminance) controls the color shade, intensity, and brightness. You can control all these three factors to color correct your photos in the HSL Panel.
While the HSL Panel may feel a bit intimidating at first, it’s actually very intuitive with the design of the sliders. Each slider will let you preview the effect it has on the image so you can adjust accordingly.
Lightroom features HSL sliders that help improve the colors of your creative shots. Hue, Saturation, and Luminance work together to create a well-composed photo. While you can flip between the three areas by using layers, you can also open up all three sliders for more cohesive editing.
Hue
Uses numbers to describe colors, as well as to differentiate the colorfulness and lightness of hues. When you use the Hue slider, you can replace the existing hues with the bordering colors present in the color wheel.
Saturation
Refers to the power behind the color. With the Saturation slider, you can either increase or decrease the color’s strength. Hence, you’ll make the colors less or more prominent.
Luminance
Shows the brightness of colors. Decreasing the Luminance slider makes the colors darker while increasing the slider makes the colors stand out more.
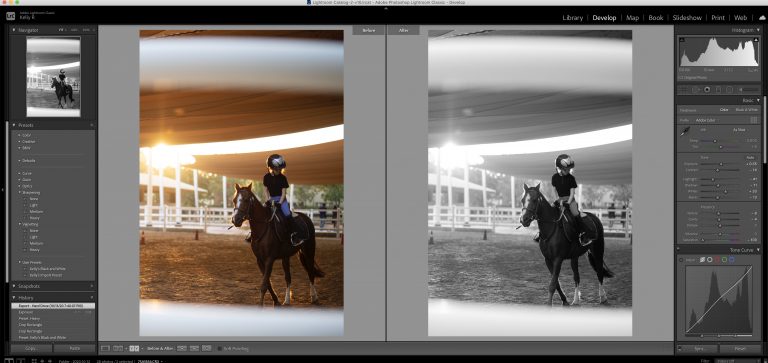
Convert Photos to Black and White
With a simple click, you can convert photos to black and white in Adobe Lightroom. You can do this by selecting the Black and White tab in the adjustments panel in the develop module. Lightroom will automatically apply a black and white mix auto setting, and it’s up to adjust.

How to Correct Exposure
Exposure is the amount of light that your camera sensor receives. Correctly exposed photos balance brightness and darkness. Underexposed photos lack appropriate light, while overexposed pictures appear brighter than they should be.
You can modify image exposure using these Adobe Lightroom tools:
Exposure slider
Controls a photo’s overall brightness. Moving the slider to the right makes the photo brighter while sliding to the left produces a darker photo.
Highlights
Moving the slider to the left makes the highlights darker while sliding to the right turns highlights brighter.
Shadows
Move the slider to the right if you want to recover details in the shadows. Turn shadows darker by sliding to the left.
Saving Images
After applying corrections, fixes, and adjustments to your photos, you will want to export them in the appropriate format.
In the file drop-down menu, click export and the dialogue box will pop open. From there you have all the options to save your photos in a format that is suitable for your needs. You can export them for print or for sharing on the web.
During this process, you can also add watermarks and other metadata to your final images.
Export and Backup
One of the best things about Lightroom is that you can use it to export and backup files for free. Exporting won’t delete the original copy of your files, it will merely create a new copy for you to edit, save, and send. You can export photos from Adobe Lightroom using these:
Export Photos from Lightroom to Hardware
Start by choosing your photos from the Grid view to export. Select File > Export, or click the Export button in the Library module. Pick Export To > Hard Drive in the pop-up menu.
Then, choose an export preset. Specify a destination folder, naming conventions, and other options in the Export dialog box panels. After saving your export settings, click Export.
Multi-Batch Export
When you select multiple presets and export a photo, Adobe Lightroom exports a photo for every preset selected.
Choose pictures from the Grid view. Select the Export button in the Library module and choose where you want to export the files. After selecting the presets, click Export and choose the export location.
Lightroom Export for Print
Since there are various print sizes, Lightroom offers different export settings for high-resolution print.
Set the image format to JPEG and put the quality slider at 100 to retain the photo’s highest quality. Leave the Resize to Fit Box unchecked to maintain full size.
The resolution export setting must be 300 pixels per inch. The Output Sharpening depend on the intended print format and printer. Finally, pick Matte Paper and a low amount of sharpening.
Lightroom Export Settings for Web
When it comes to displaying photos on the web, there are times that achieving a smaller file size becomes more essential than having extremely high resolution.
Choose the Image Format to JPEG and put the quality slider around 77 to 100. Pick the export setting to sRGB. Check the Resize to Fit Box to put the size you want.
While we recommend the long edge at 2048 pixels, you can also input particular dimensions that are appropriate for a website or social media accounts. Finally, set the resolution to 72 pixels per inch, which is the standard resolution for the web.
[ad id=’5′]
Lightroom vs Photoshop
You may be wondering about the difference between Lightroom and Adobe Photoshop. For general photo editing, the go-to editing software for professional photographers is Lightroom.
Lightroom has everything you need to do the necessary adjustments to your pictures. It can also batch edit with presets and organize your photos neatly.
Adobe Photoshop has all of the same features plus a lot more that you will hardly, if ever, use. Lightroom is designed for photographers only, while Photoshop is primarily used by graphic artists, designers, architects, and many other visual artists.
Practice Makes Perfect

Getting familiar with Lightroom takes time and patience, but it’s definitely worth it.
Lightroom is the most popular editor for photographers. It has everything you need to get the job done. You can find Lightroom tutorials online when you encounter a specific issue with your photos.
If you need more than Lightroom tutorials, you can also join the Cole’s Classroom free membership program and we can help you get up and running with Lightroom in no time. You will even have access to Lightroom presets personally created by Cole.
The best way to learn and get comfortable with the Lightroom software is to get in there and practice. Play around in the panels and try the variety of tools available.
Along with the valuable knowledge, you will acquire in Cole’s classroom, your practice is what will take your digital photography skills to the next level.