Learn Why and How to Use Off Camera Flash for Daytime Portraits!
It’s no secret that photographers despise taking portraits under harsh, midday sunlight. The midday sun can be overpowering, cause unwanted shadows and simply make it hard on your subjects to be comfortable and not squint in every photo. But sometimes, a high noon or mid-day photography session can’t be avoided. We can’t always dictate the time of our sessions. And sometimes, shade is hard to come by. Weddings, events, and parties can all happen at times outside of the golden hour. So what’s a photographer to do? Join me as I cover how to overcome the sun and give you a few tips on how to use off camera flash for daytime portraits.
Looking to improve your photography? Just enter any questions you have about improving your photography below and hit send and get answers & feedback instantly - for FREE! Submit QuestionsThe Problem with Shooting in the Sun
When working out in the sun with little cover for shade, you have two primary ways to take on the sun. First, you can expose for your subject’s faces and overexpose the sky or background. Second, you can use flash or reflectors to fill in shadows on faces and retain the vibrant colors within the sky or background. But to use a reflector or use off camera flash for daytime portraits or, an assistant is often required. The assistant also needs to lend a helping hand and help light the subjects without being in the shot.
In this written & video tutorial I am going to show you how to use off camera flash for daytime portraits without needing an assistant to help. It is surprisingly very simple – so read on!
Do you need flash for outdoor photography?
The answer is sometimes you may want or need off camera flash for daytime portraits or even for night scenes. As I said before, events and sessions don’t always adhere to the hours of beautiful light. You might have to photograph a noon wedding or a 1 p.m. family reunion. And sometimes there simply isn’t any shade to use. But how do you use flash in the daylight?
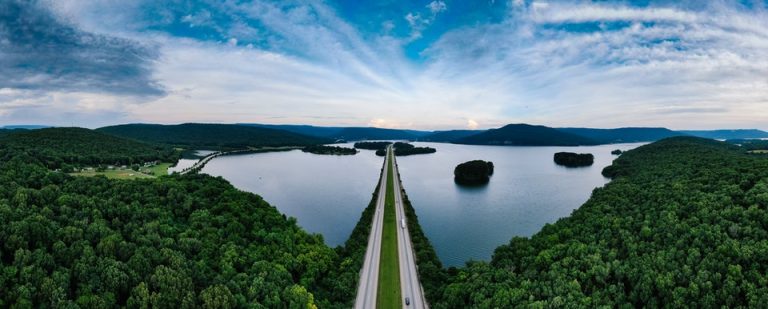
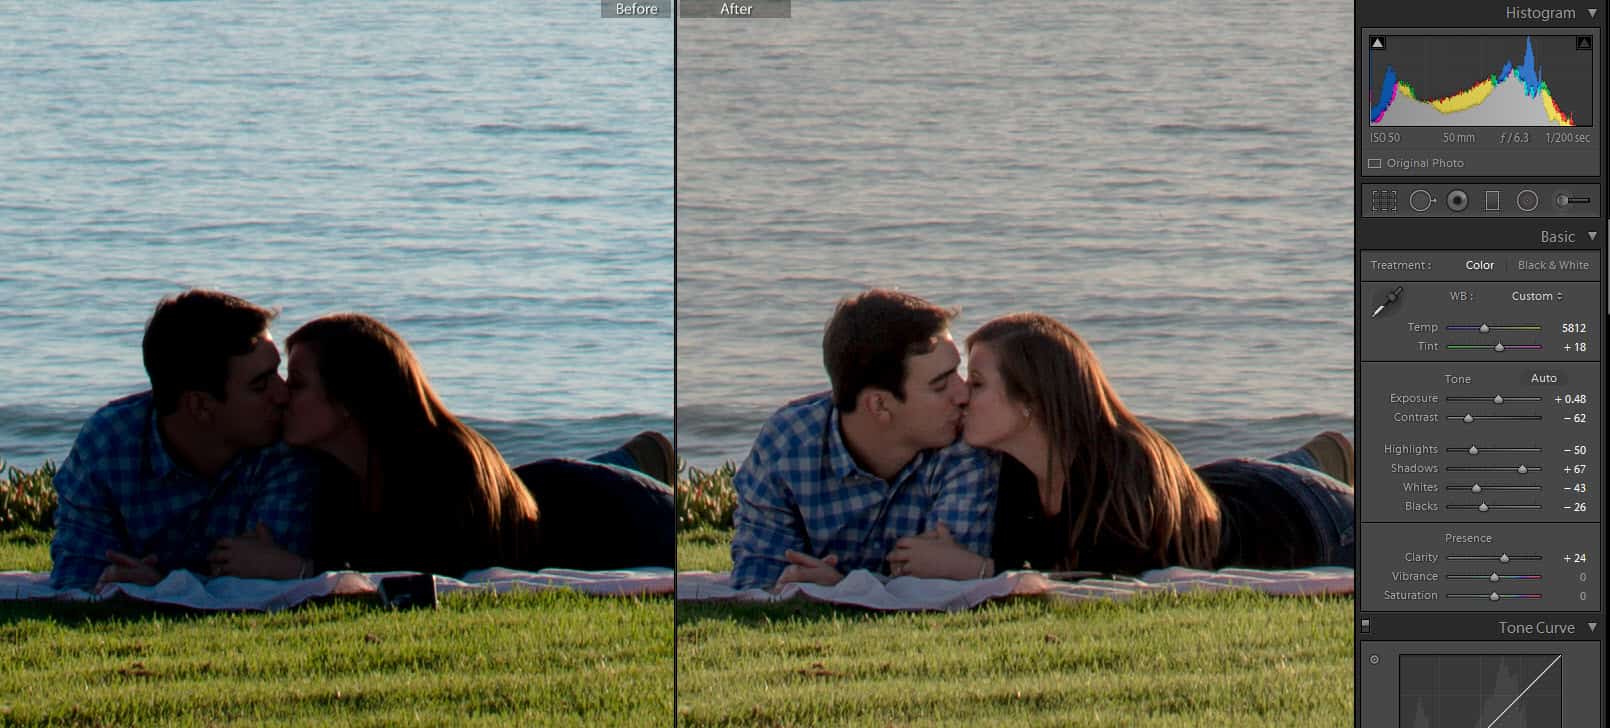
Before we jump into “how” I want to make sure everyone understands the “why.” Let’s start by understanding that this image is exactly how your very own eyes would have seen the scene. Our human eyes don’t add fill flash having both subjects and backgrounds properly exposed – they expose for one or the other. Keep that idea in your mind in everyday life and understand how similar our own eyes are relative to our cameras, it’ll help you understand light and how to manipulate it to get the desired results you want.
Whether you prefer to shoot natural light or not, it is important to know exactly how to make amazing photos within any type of lighting situation.
The image on the left is without any flash being used and the image on the right is to show how the photo would look if using natural light only, exposing for their faces. Notice the photo on the right looking “natural” but yet the overall photo loosing some of its vibrancy.

How do you expose correctly to use off camera flash for daytime portraits?
Now that we understand the “why” lets jump into the “how”…
Step 1 – Get Proper Camera Settings for Background
When using flash, the key is to remember the primary reason for using off-camera flash is to fill in the shadows. That way, you retain color and detail in the sky or background. So to put that idea into practice, we need to get proper exposure for the ambient lighting.
During the day, our ambient lighting is most often the sky. When using off-camera flash, most cameras have a maximum flash sync speed of 1/200th or 1/250th of a second. That means the fastest shutter speed you can use when shooting with your flash is 1/200 or 1/25. Otherwise, your shutter opens and closes faster than the flash can completely fire. (If you’ve ever tried flash and had a black bar at the bottom of your image, that’s probably what happened.
To set exposure with off camera flash, you’ll first need to have your camera in manual mode (or shutter priority mode).
Next, set your shutter speed. Then adjust your ISO as low as possible. Finally, adjust your aperture so that you in-camera light meter reads zero while your camera is pointed at the sky or background.
Remember, we aren’t worried about lighting the subject right now…just the ambient. You might find that you need to underexpose or overexpose your scene to get the image looking as you’d like it.

Step 2 – Add Flash for Subjects
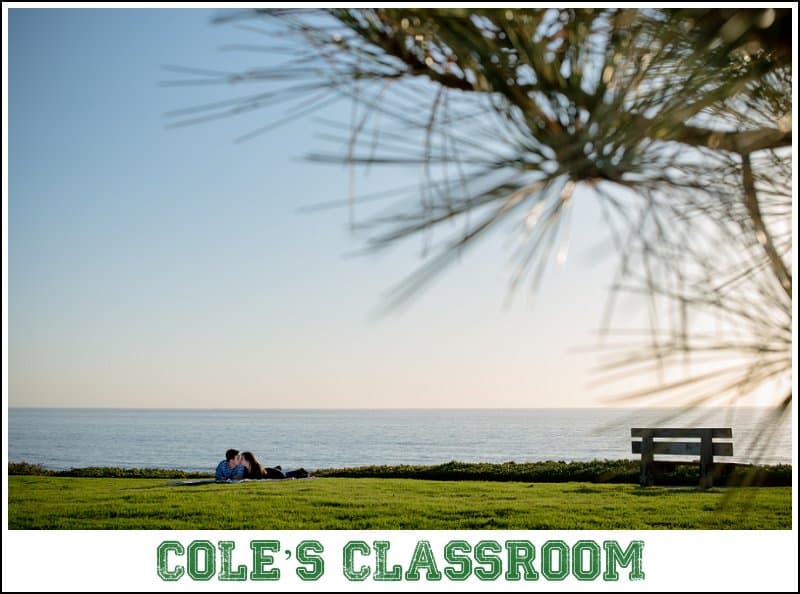
In the image above, our subject is facing away from the sun, so their faces are shaded. This is why we occasionally need to use off camera flash for daytime portraits…without it, our subjects would be underexposed or our background would be overexposed!
Just like I can’t tell you what shutter speed or aperture will work for your scene, I can’t tell you what power to set for your flash. The actual power required from your flash will depend on how intense the sun is that day, location of the sun, distance to subjects, etc… You’ll have to take a couple of test shots to decide how much flash power is required. As you’ll see in my example, my flash was set to manual mode and 1/32 power. You can start at full-power and walk your flash down in power until you have your subject properly exposed. Or start at the lowest power setting and work your way up. How you get to the proper exposure is up to you!
Notice that in my photo, I wanted to incorporate the entire scene, a wide and expansive view, and I’d have no place to hide a flash – so I placed the flash down on the grass right in front of them, knowing I’d simply remove it later once in Lightroom.
Step 3 – Editing within Lightroom
Once in Lightroom the photo editing process will be business as usual. The one exception is you might need to remove the flash from the photo if you want to take a wide-angle off-camera flash shot as I did. But as you’ll see in the video below, that is an easy 30-second process. For my own editing steps within my photo see the following steps “A through D.”
A – Original image straight from the camera

B – Apply preset – “Crisp, Clean, Color” applied

C – Remove flash from the photo using Spot Removal Tool

D – Straighten horizon using Crop Tool

And here is the final resulting image using the quick steps outlined above. The result is a properly exposed sky & subjects and a unique capture in the sense that its a wide angle portrait showing off the gorgeous landscapes and blue sky while still having them lit perfectly. All it took was 30 seconds in Lightroom 5 to remove the flash and put one of my favorites presets on!
Another off-camera flash daytime portrait from a different vantage point…

What modifiers do you use for off camera flash for daytime portraits?
Using High-Speed Sync
Some flashes are equipped with technology called high speed sync, or HSS. Intstead of firing one long flash burst, the flash will fire several short bursts of light while the shutter is open. It simulates a continuous light.
The camera records these bursts as one long flash, though, and you couldn’t tell the difference between a shot using HSS and one using traditional flash.
The advantage of HSS is that you can use it at shutter speeds faster than 1/200th or 1/250th of a second. So if you are in really bright light and need to close down your shutter to faster than 1/200th of a second, HSS lets you do that. HSS will also let you shoot at lower apertures than you might otherwise be able to in very bright conditions.
The disadvantages of HSS is that you have to have a flash and wireless remote/trigger system that supports HSS. Not all speedlights have HSS, and only a few strobes offer this function. HSS also makes your flash work harder. It cuts your power and uses battery faster.
Even if you use high-speed sync, you’ll still set your exposure the same way. Expose for the ambient light, then add in your flash only on your subjects.
How do you take portraits with flash at night?
But what if you don’t want to use off-camera flash for daytime portraits, but for portraits at night instead? It’s the same process. Expose for your ambient, then light your subjects with your flash. Adjust the amount of light falling on your subject by adjusting the power on your flash, or by moving the flash and modifier closer or father from your subjects.
I hope this quick tutorial shows you exactly how to use off-camera flash for daytime portraits in the sun, and even do so without the help of an assistant! Whether you prefer to shoot natural light or not, it is important to know exactly how to make amazing photos within any type of lighting situation.
If you enjoyed this article, check out some of our additional off-camera flash technique tutorials linked below. And don’t forget to grab a set of our free Lightroom presets collection linked below!
Key Resources:
Simple Off Camera Flash Techniques for Stunning Wedding Photos
Cole’s Classroom – Lightroom Preset Collection Download (Free)
Gear Used for Above Photo Shoot (links to product):
D800, 50 1.4G lens, SB-700 flash, Phottix Strato II Triggers
https://www.youtube.com/watch?v=6BM0zxqLmGk